Spectral film simulations in ART
(with contributions by Leopoldo Saggin and Sébastien Guyader)
This article shows how to integrate two recent projects for emulating the look of various film stocks using a physics-based simulation pipeline in ART, namely spektrafilm and Spectral Film LUT.
The instructions should work for any major platform supported by ART itself. The integration is based on the external 3dLUT feature available in ART since version 1.25.3.
Contents:
Initial environment setup
Since both agx-emulsion and Spectral Film LUT rely on Python, the use of a virtual environment for Python is recommended. Here we will describe how to install and use virtualenv which is a fast, cross-platform tool for managing isolated Python environments which allow installing and running different versions of Python.
In case you don’t have Python installed already, install a recent version (from https://www.python.org/ for example). If your Python version is < 3.8, please update.
Note for Windows users: it seems like the current version of Python at the time of writing (version 3.14) prevents installing Python 3.13 from the virtualenv. It is suggested to directly install Python 3.13 as the main Python version on your system.
Now you can install pipx for your OS from here: https://pipx.pypa.io/stable/installation/.
To install virtualenv, run the following commands in a terminal (for Windows, cmd.exe or PowerShell):
pipx install virtualenv
pipx ensurepath
Now close your terminal window, open a new terminal and create a virtual environment called ART-filmsim.
For Windows:
virtualenv --python 3.13 c:\users\<username>\envs\ART-filmsim
For macOS/Linux:
virtualenv --python 3.13 ~/envs/ART-filmsim
This will create a new envs folder in your home user directory, of course you can change it to the path/forlder name you like but don’t forget to update the following commands.
Integration of spektrafilm
Activating the virtual environment
For Windows:
- if you use cmd.exe type:
c:\users\<username>\envs\ART-filmsim\Scripts\activate.bat
- if you use PowerShell:
c:\users\<username>\envs\ART-filmsim\Scripts\Activate.ps1
For macOS/Linux:
source ~/envs/ART-filmsim/bin/activate
Once the Python virtual environment is activated,
you will see (ART-filmsim) displayed in the command prompt.
Dowloading the spektrafilm code
As spektrafilm is in active development, it is recommended to use one
of the official releases rather than working from the git repository
directly. At the time of writing this, the latest release is v0.3.2,
which can be downloaded from
https://github.com/andreavolpato/spektrafilm/releases/. You can just
download a zip/tarball of the release, and extract its content to
/path/to/local/spektrafilm.
Installing spektrafilm
With the (ART-filmsim) environment active in your terminal, type:
cd /path/to/local/spektrafilm
pip install -e .
And launch the GUI:
spektrafilm
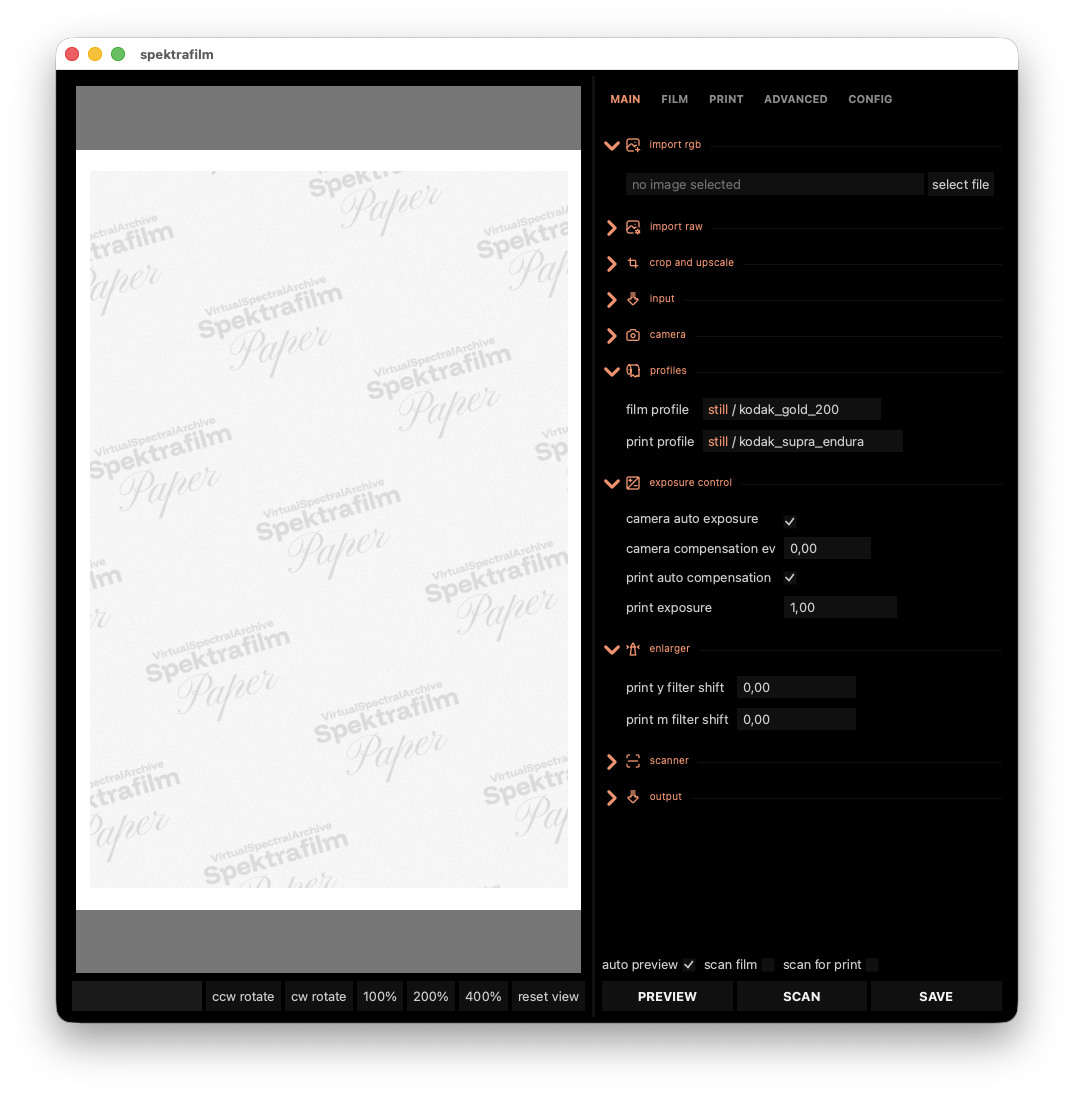
If everything went well, a window should pop up which will let you experiment with spektrafilm. For instance, you can load the provided test image (located in /path/to/local/spektrafilm/img/test) or any image of your choice and play with the film and print emulsions to ensure the module works.
Integration in ART
In order to use the module in ART, download the support scripts ART_spektrafilm.json and spektrafilm_mklut.py, and save them both in the same directory of your choice. It is crucial that both files reside in the same directory.
Note: the most convenient place to save both files is the 3D LUT directory declared in ART’s Preferences > Image Processing > Directories > CLUT directory.
ART_spektrafilm.json is a configuration file which sets the Python command to run the script spektrafilm_mklut.py. By default the command is:
"command" : "python3 spektrafilm_mklut.py --server",
Since the actual command depends on your operating system and Python install environment, you need to open it with a text editor and edit line 12 to point to the Python interpreter you used to install spektrafilm.
If you followed the instructions above to install virtualenv and Python 3.13, you will need to update this command with:
(for Windows)
"command" : "C:\\users\\<username>\\envs\\ART-filmsim\\bin\\python spektrafilm_mklut.py --server",
(for Linux and macOS)
"command" : "/home/<username>/envs/ART-filmsim/bin/python spektrafilm_mklut.py --server",
and save the file. Please also note the presence of a “comma” at the end of the line!
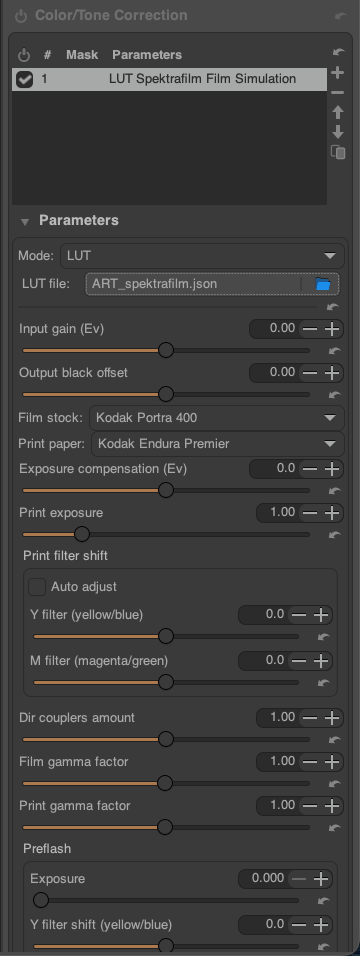
Now when you restart ART you should be able to load ART_spektrafilm.json as a LUT from the “Color/Tone Correction” tool in the “Local editing” tab, or from the “Film Simulation” tool in the “Special Effects” tab.
At this point you can test if everything works:
- Open an image in ART
- Activate the “Color/Tone Correction” tool and, from its “Mode” dropdown menu select LUT (note that default mode is generally Standard or Perceptual)
- The program will ask for a LUT file
- Select ART_spektrafilm.json
- At this point a large set of parameters appears, as reported in the image below, and you can play and choose the film simulation you wish to simulate etc…
Updating spektrafilm
In order to keep both the spektrafilm Python code base and its support in ART up to date:
- update your local spektrafilm version by downloading the new release from GitHub and refer to the second command in the spektrafilm section above
- download the spektrafilm_mklut.py and ART_spektrafilm.json files from https://github.com/artraweditor/ART/tree/master/tools/extlut again, and replace the existing files in ART’s CLUT directory with the new ones.
Integration of Spectral Film LUT
The procedure is very similar to the one above for spektrafilm. The description assumes a Unix (i.e. Linux/macOS) environment, see above for the Windows-specific changes.
First, we activate the Python virtual environment:
source ~/envs/ART-filmsim/bin/activate
Then, install Spectral Film LUT:
pip install git+https://github.com/JanLohse/spectral_film_lut
pip install matplotlib networkx opencv-python
In order to use the module in ART, download the support scripts
ART_spectral_film.json and
spectral_film_mklut.py,
save them both in the same directory of your choice,
and modify the "command" line of ART_spectral_film.json to use the Python interpreter from the virtualenv above, changing it from:
"command" : "python3 spectral_film_mklut.py --server",
to:
"command" : "/home/<username>/envs/ART-filmsim/bin/python spectral_film_mklut.py --server",
Now you can load the ART_spectral_film.json file as LUT in the “Color/Tone Correction” tool:
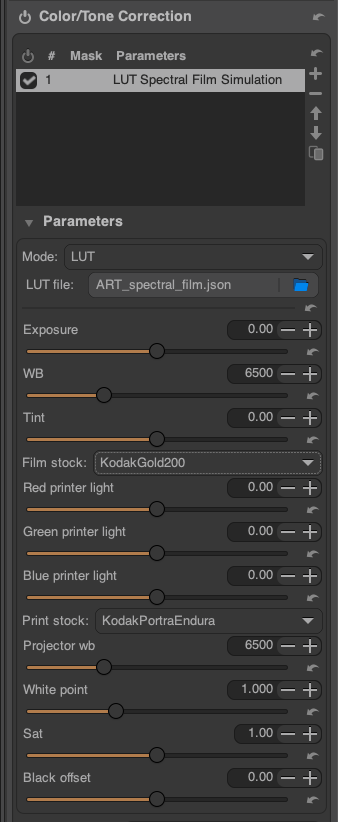
And if you want, you can also put it in your configured CLUT directory to have it appear in the “Film Simulations” tool.
Disclaimer
All the information provided on this document is provided on an “as-is” basis and you agree that you use such information entirely at your own risk. We give no warranty and accept no responsibility or liability for the accuracy or the completeness of the information contained in this document.
(Version 0.5 – 2026/05/30)